Windows
 macOS
macOS Linux
Linux Android
 iOS
iOSHow to Set Up Traverse VPN on Windows 11: Complete Step-by-Step Guide

Written by
Shubham Sharma
Shubham Sharma
VPN Researcher & Technology Writer
Shubham Sharma specializes in VPNs, online privacy, and cybersecurity content. He researches and tests VPN services, evaluates privacy policies, compares security features, and analyzes real-world performance to help readers make informed decisions. His goal is to provide clear, accurate, and unbiased information about online security tools.

Reviewed by
Jake Walker
Jake Walker
Founder & CEO, Traverse VPN
Jake Walker is the Founder and CEO of Traverse VPN, with a strong focus on digital privacy, internet security, and online freedom. He reviews VPN-related content to ensure technical accuracy, transparency, and alignment with industry best practices. His expertise includes VPN technology, encryption standards, and privacy-focused solutions.
Last updated:
Expert Verified✓
.jpeg)
Setting up Traverse VPN on Windows 11 takes under five minutes and you do not need any technical background to do it.
This guide walks you through configuring Traverse VPN on Windows 11 using the built‑in VPN client, from the Settings app to your first verified private connection.
One important thing to know before you start: Windows 11 includes a built‑in VPN client, not a full VPN service.
Traverse VPN’s native app is currently available on iOS, Android, and macOS, while Windows 11 users connect by manually entering their Traverse VPN server credentials into the Windows VPN client.
This guide covers that manual configuration process exactly, using the same method Microsoft documents in its official VPN instructions.
Quick Summary (TL;DR)
You need your Traverse VPN account credentials (server address, username, password) before starting.
-
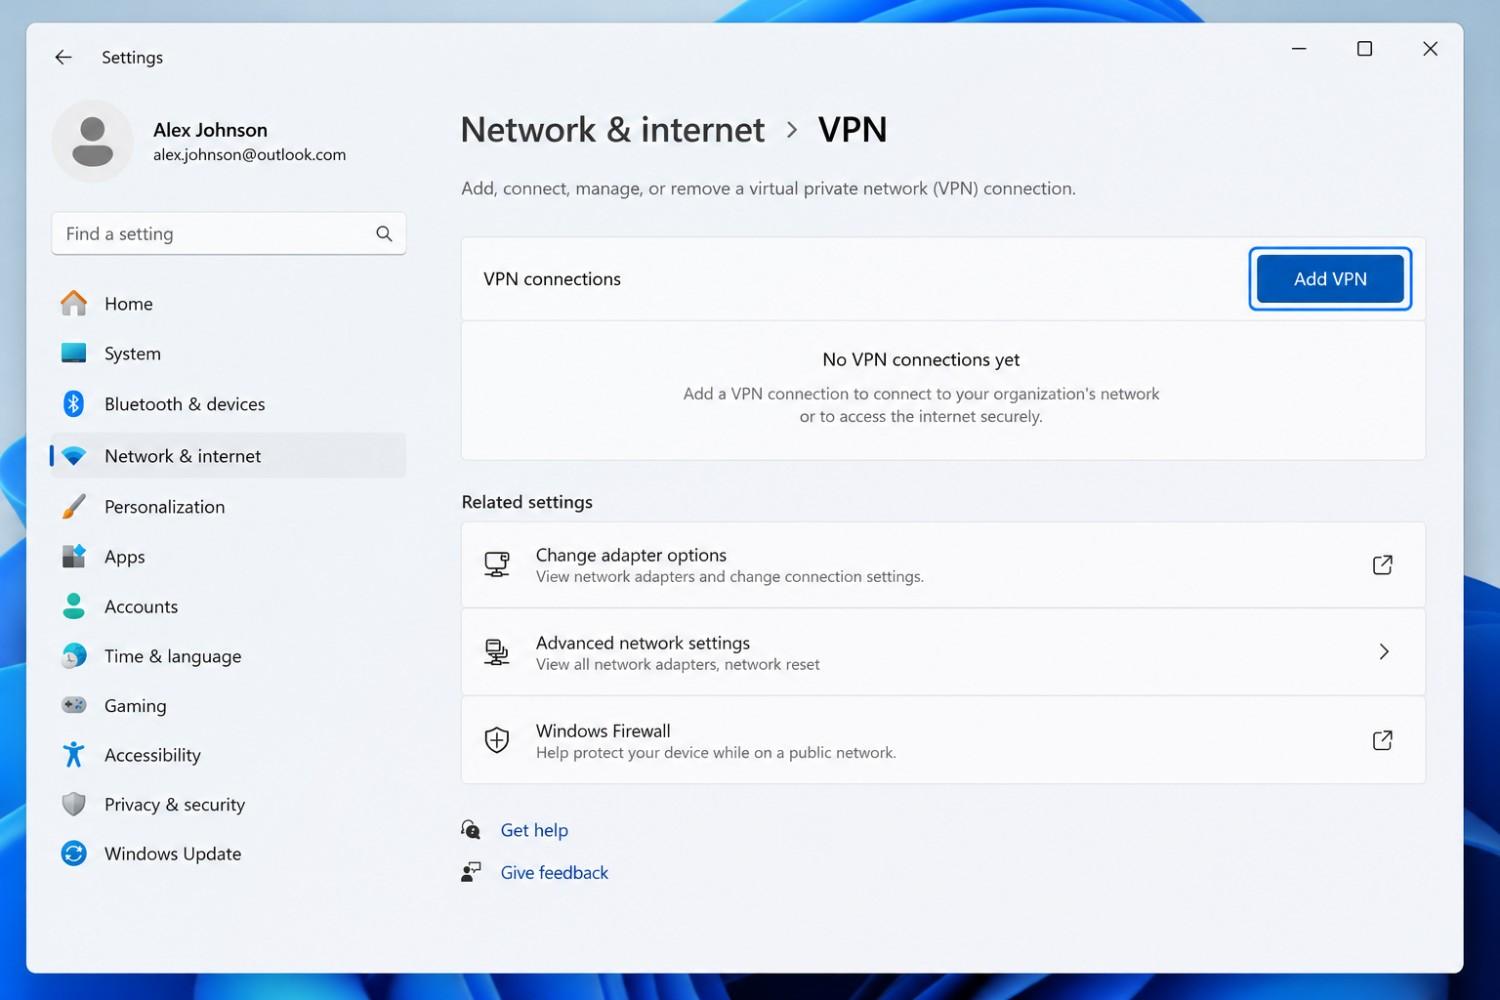
Setup goes through Settings > Network & internet > VPN > Add VPN.
-
The full process takes 3–5 minutes with no extra software to download.
-
After connecting, verify your VPN is working by checking your IP at whatismyip.com.
If your VPN shows “Connecting” but never connects, a Windows Defender Firewall rule or network adapter issue is a common cause.
-
Traverse VPN has native apps on iOS and Android with one‑tap connect, AI Chat, and a Scam Link Scanner.
What You Need Before Setting Up Traverse VPN on Windows 11
Before you open a single Settings menu, gather these items — missing any one of them can stop the setup halfway.
Setup checklist:
- Windows 11 PC (any edition: Home, Pro, or Enterprise).
- Active internet connection.
- Traverse VPN account — sign up at traversevpn.com if you do not have one; a free tier is available.
- Your Traverse VPN server address (provided in your account dashboard after sign‑up).
- Your Traverse VPN username and password.
- Approximately 5 minutes.
The server address is the detail most people overlook. Log into your Traverse VPN account and find the “manual connection details” or “server configuration” section before you begin.
The exact location in the account dashboard can vary by plan, so check your welcome email or the support section at traversevpn.com if you cannot find it immediately.
A VPN is only as reliable as the credentials you configure it with, so take 60 seconds to confirm your server address, username, and password are correct before starting.
How to Set Up Traverse VPN on Windows 11 (Step-by-Step)
Setting up Traverse VPN on Windows 11 uses Microsoft’s built‑in VPN client, so no third‑party software is required. These steps are based on the Windows 11 24H2 Settings interface and are similar to Microsoft’s official VPN guide.
Step 1: Open VPN settings in Windows 11
- Press Windows + I to open the Settings app directly, or click Start and select the Settings gear icon.
- Click Network & internet in the left sidebar.
- On the right side, click VPN. You will see a section titled VPN connections with an Add VPN button at the top.
Step 2: Create a new VPN profile for Traverse VPN
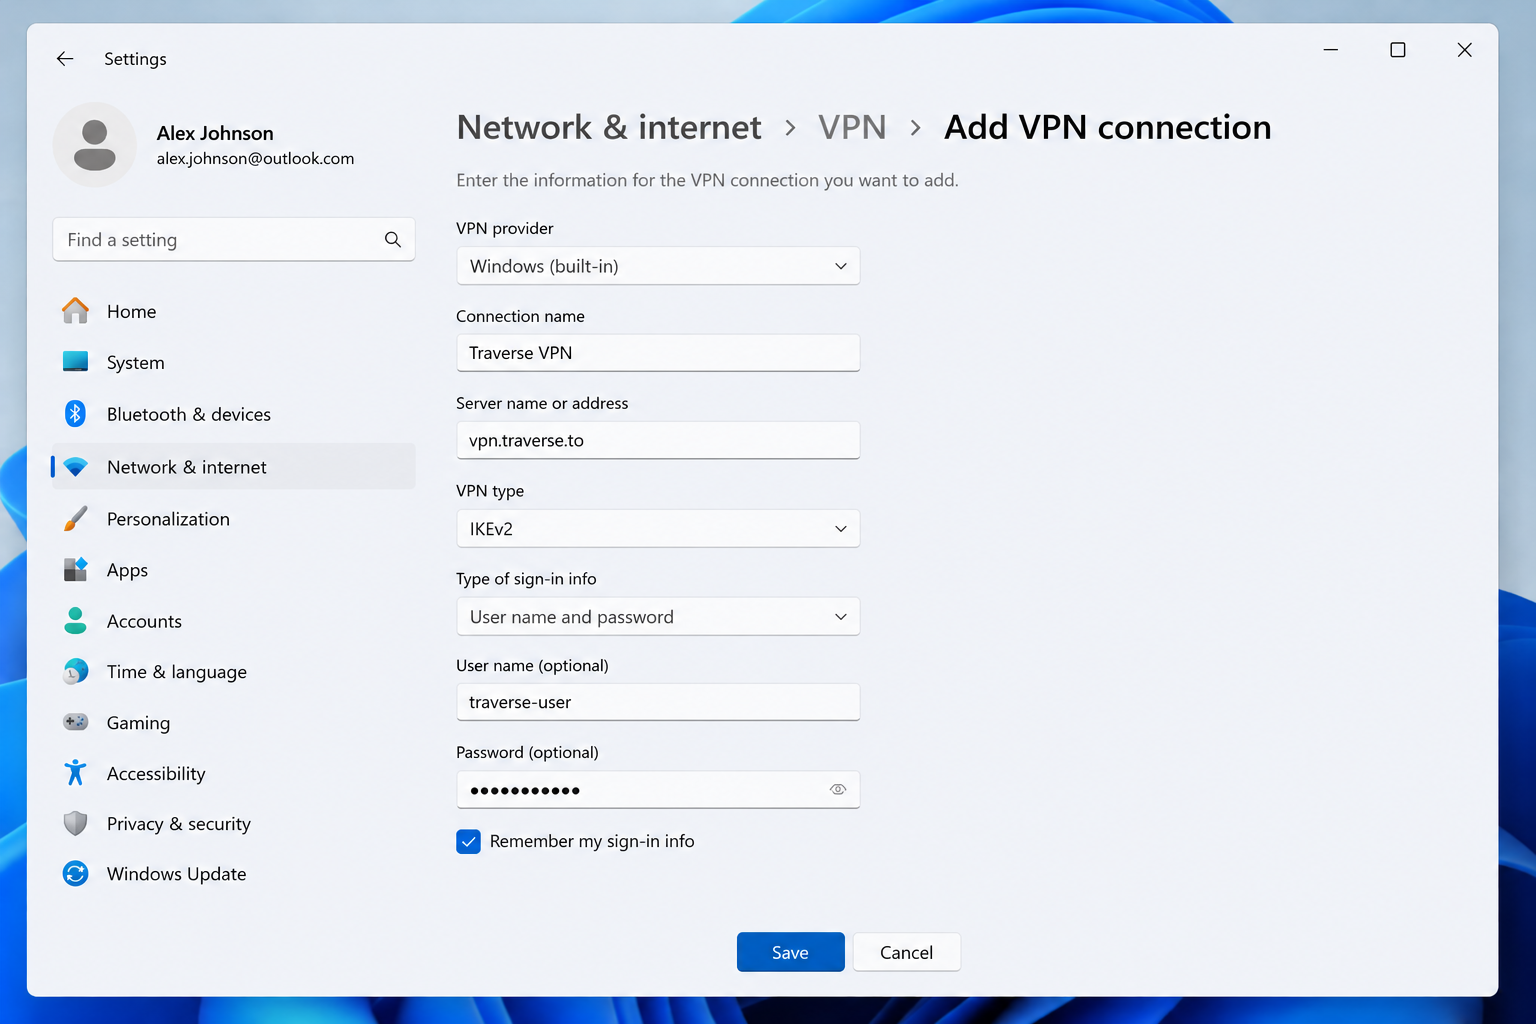
- Click Add VPN. A panel opens with several fields.
- Fill the fields as follows:
- VPN provider: Select Windows (built‑in).
- Connection name: Type a name you will recognize, such as “Traverse VPN”.
- Server name or address: Enter the server address from your Traverse VPN account dashboard exactly as shown.
- VPN type: Select IKEv2 (recommended for speed and stability) or leave it on Automatic if you are unsure.
- Type of sign‑in info: Select Username and password.
- Username: Enter your Traverse VPN username.
- Password: Enter your Traverse VPN password. If you prefer not to save it on this PC, leave this blank and enter it each time you connect.
- Double‑check that there are no extra spaces before or after the server address, username, or password; even one space can break the connection.
- Click Save. Your Traverse VPN profile now appears in the VPN connections list under the name you chose.
****
Step 3: Connect to Traverse VPN
- In Settings > Network & internet > VPN, click your Traverse VPN connection name to expand it.
- Click Connect. Windows will attempt to establish the VPN tunnel.
- When the connection succeeds, the status changes to Connected and you may see a shield or network indicator in the taskbar showing an active VPN connection.
If you get an error at this stage, skip down to the troubleshooting section and then come back once the error is resolved.
How to Connect Traverse VPN from the Windows 11 Taskbar
Once your profile is saved, you do not need to open Settings every time.
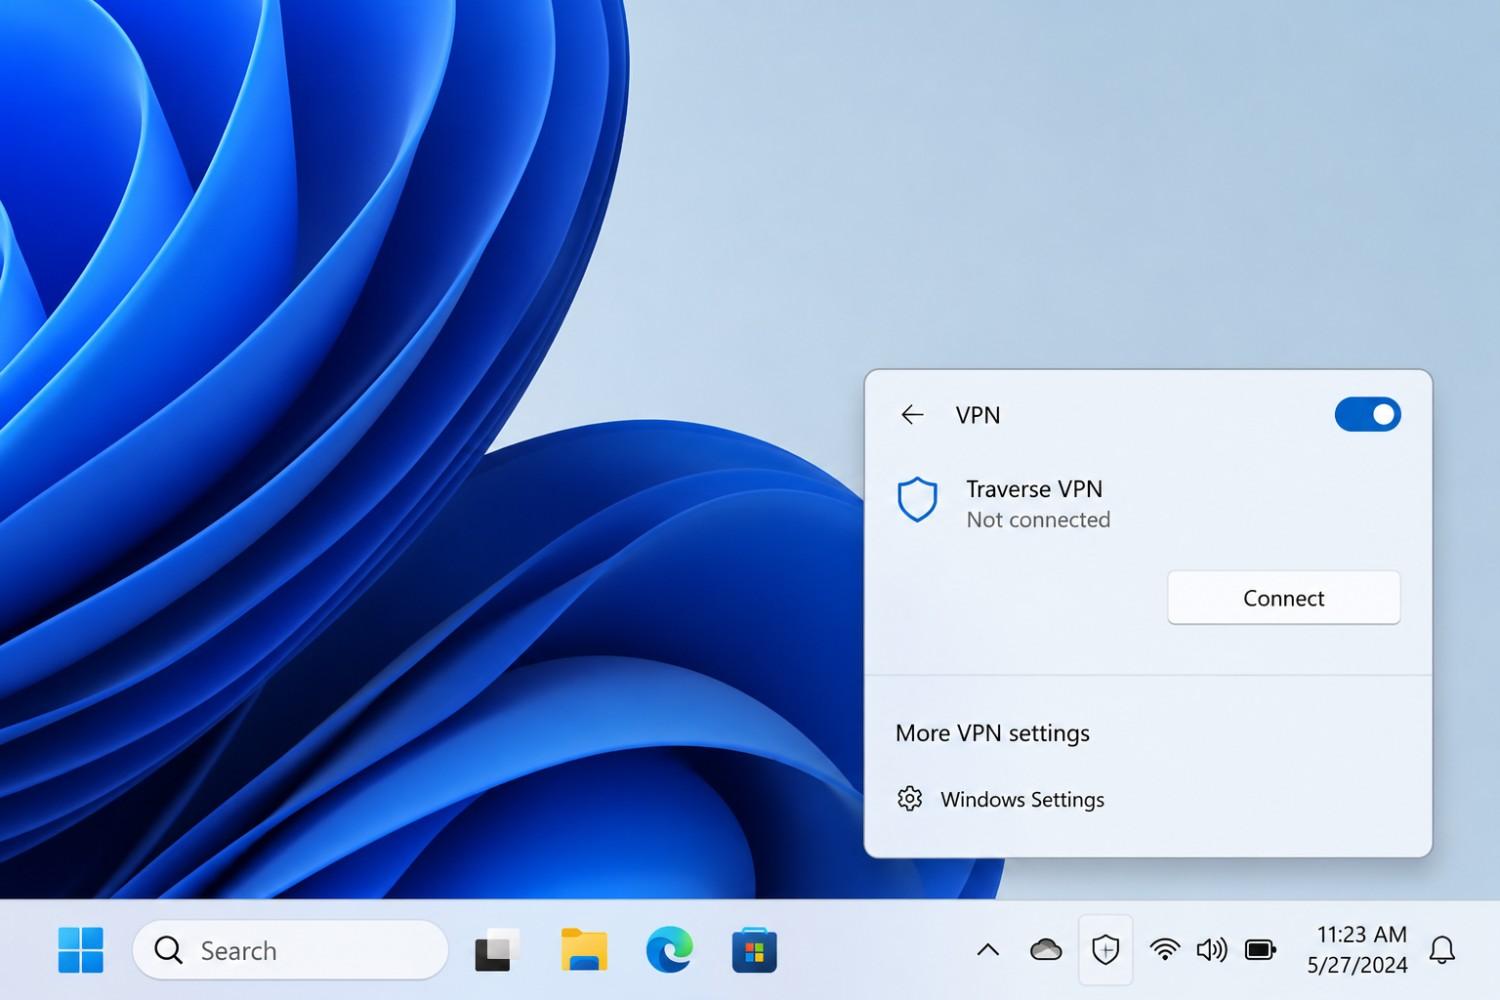
- Click the network icon in the bottom‑right taskbar area (the Wi‑Fi or Ethernet symbol).
- In the quick network panel, find your Traverse VPN profile.
- Click Connect to start the VPN tunnel in one step.
This is the fastest route for daily use and works the same as using the Settings app.
IKEv2 is recommended for most users because it balances speed and security, reconnects automatically if the connection drops, and is natively supported by Windows 11 without extra drivers.
****
How to Verify Your VPN Is Working on Windows 11
Connecting and actually routing traffic through the VPN are not the same thing. This quick test confirms that your traffic is going through Traverse VPN.
- Before connecting: Open a browser and go to
- whatismyip.com
- Note your current IP address and location — this is your real IP address from your ISP.
- Connect to Traverse VPN using your Windows 11 profile.
- Reload whatismyip.com. Your IP address and displayed location should now show the VPN server location, not your home or office location. If the IP has not changed, the VPN tunnel is not routing traffic correctly — jump to the troubleshooting section.
- Run a DNS leak test: Visit
- ipleak.net
- while connected. The DNS servers shown should match the VPN server location or Traverse VPN’s DNS, not your internet provider’s DNS. If you still see your ISP’s DNS here, your DNS requests are leaking outside the VPN tunnel.
Traverse VPN includes DNS and WebRTC leak protection, but Windows adapter settings can override this.
If ipleak.net still shows your ISP’s DNS after connecting, check that the DNS settings in your active network adapter are not manually set to a third‑party DNS.
Switching DNS to Obtain DNS server address automatically usually resolves this. A clean ipleak.net result — showing only VPN DNS servers and IPs — confirms your traffic is fully protected.
What to Do After Setting Up Traverse VPN on Windows 11
Once your Windows 11 connection is running, it covers your desktop browsing, downloads, and app traffic through the VPN tunnel. Traverse VPN, however, offers more than basic IP masking, and you access its full feature set on other devices via the native app.
- Traverse VPN native app (iOS and Android): The mobile app provides one‑tap connect, AI Chat with encrypted conversations, and a Scam Link Scanner that checks URLs before you open them.
- Split tunneling (iOS and Android): Added in the March 2026 update, split tunneling lets you choose which apps route through the VPN and which connect directly — useful for keeping printers and local devices accessible while your
- browser uses the VPN.
- AI Chat: Traverse VPN’s built‑in AI assistant runs inside an encrypted connection, so your AI conversations are not exposed to public Wi‑Fi or untrusted networks.
- Keep your profile updated: If Traverse VPN updates server addresses or rotates credentials, update the server address in your Windows VPN profile. Outdated server details are a very common cause of sudden connection failures.
- One practical scenario: if you work on a laptop in coffee shops and hotels, the Windows 11 VPN configuration protects your PC while the Traverse VPN mobile app covers your phone at the same time.
Best Practices for Using Traverse VPN on Windows 11
- Always use VPN on public Wi‑Fi such as cafés, airports, and hotels to prevent local network snooping.
- Avoid saving passwords on shared PCs; leave the password field blank and enter it manually each session.
- Reconnect if your network changes (for example, moving from Wi‑Fi to Ethernet) to make sure the VPN tunnel re‑establishes with the new connection.
- Check for profile updates monthly in your Traverse VPN account to make sure server addresses are still current.
- Run an IP check after any major change (new server, new protocol, or new adapter settings) to confirm your VPN is still working correctly.
Troubleshooting: Traverse VPN Not Connecting on Windows 11
Most Traverse VPN connection failures on Windows 11 come from four main causes: a firewall blocking the connection, incorrect credentials, a protocol mismatch, or a network adapter conflict. Use the table below to quickly diagnose and fix them.
| Problem | Likely Cause | Fix |
|---|---|---|
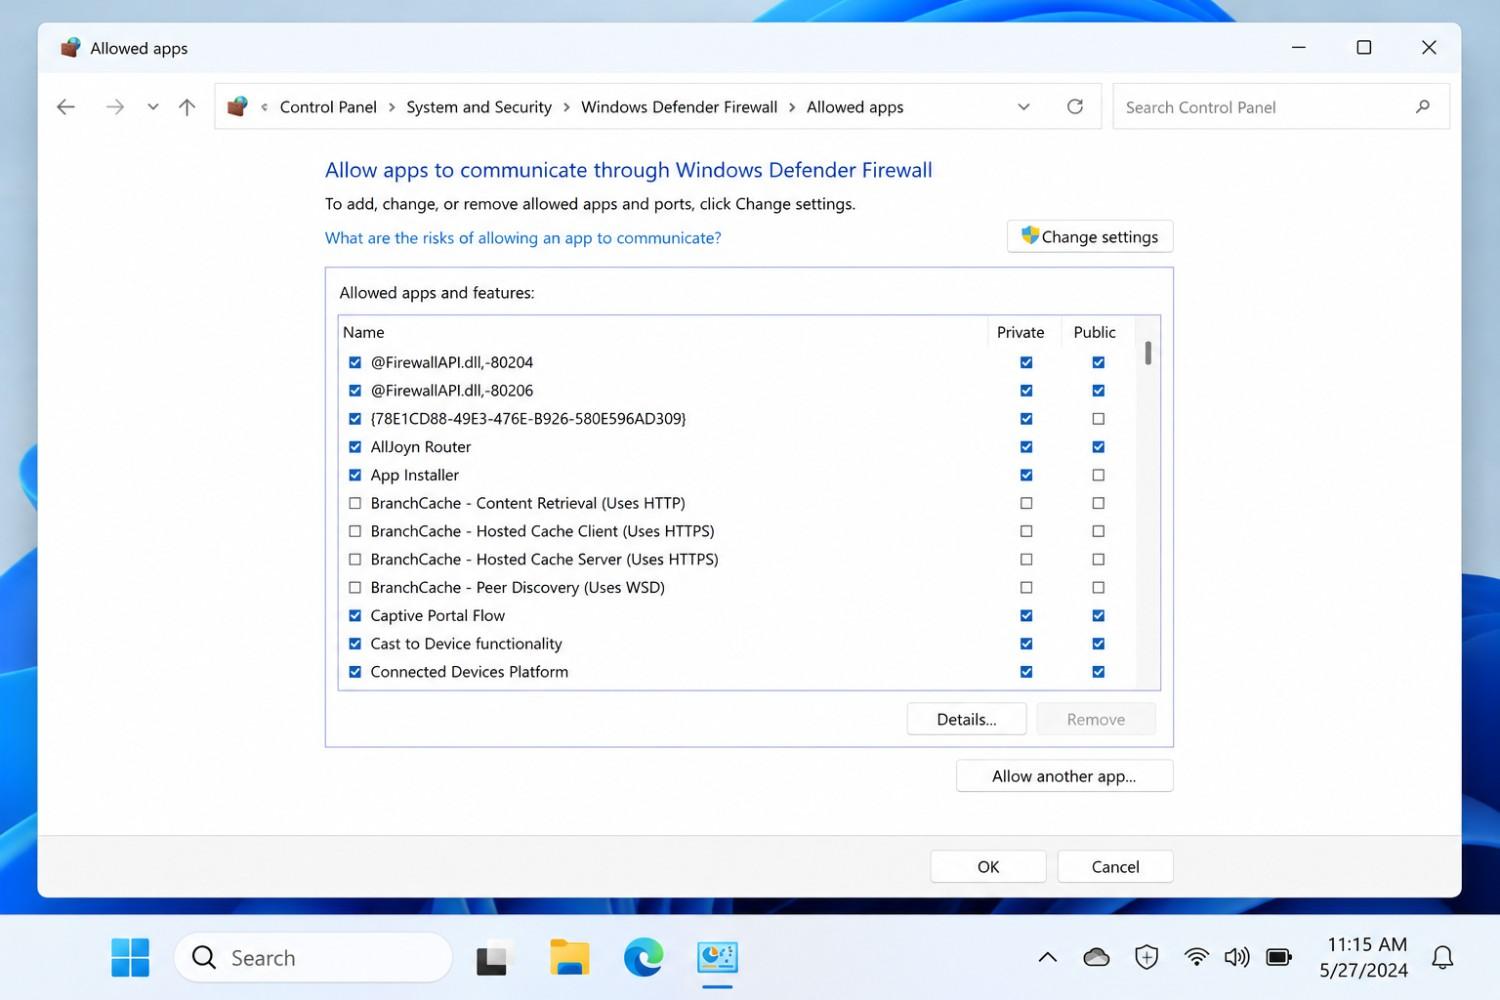
| Shows "Connecting" but never connects | Windows Defender Firewall blocking VPN port | Open Windows Defender Firewall > Allow an app through firewall > ensure the VPN protocol (IKEv2 uses UDP 500 and 4500) is not blocked |
| "The remote connection was not made" error | Incorrect server address in VPN profile | Re-check the server address in your Traverse VPN account and update the Windows VPN profile |
| Connected but IP address unchanged | VPN tunnel not routing traffic | Disconnect, go to VPN profile settings, confirm "Use default gateway on remote network" is checked under IPv4 properties |
| DNS leak detected at ipleak.net | DNS not routing through VPN | In network adapter settings, set DNS to automatic; do not manually specify a third-party DNS while VPN is active |
| Authentication error on login | Saved password outdated or credential mismatch | Delete the saved password in Windows Credential Manager and re-enter your Traverse VPN credentials |
| Slow speeds after connecting | Distant server selection or protocol overhead | Switch VPN type from Automatic to IKEv2 in the profile; or try a different Traverse VPN server address if multiple are available in your account |
For issues not covered in this table, Traverse VPN’s support team is available through the Help section in the mobile app or via the contact form at traversevpn.com. Most Windows 11 VPN connection failures resolve with one of these six fixes, so always start with checking the server address and credentials.
****
Common Mistakes When Setting Up a VPN on Windows 11
Many setup failures and security gaps come down to a small list of avoidable errors.
| Mistake | Why it causes problems | The fix |
|---|---|---|
| Using an incorrect or expired server address | VPN profile saves successfully but connection always fails | Log into your Traverse VPN account and copy the current server address rather than typing it from memory or older emails. |
| Skipping the IP and DNS verification step | VPN appears connected but traffic is not protected | Run a quick IP check at whatismyip.com and a DNS leak test at ipleak.net after every new configuration. |
| Choosing the wrong VPN type on restrictive networks | Some protocols are blocked on corporate, school, or hotel networks | Try IKEv2 first; if blocked, switch the VPN type to SSTP, which uses port 443 and is harder to block. |
| Saving credentials on a shared or public PC | Anyone with access to the PC can use your VPN connection | Leave the password field blank and enter it manually each session on shared machines. |
| Never updating the VPN profile when servers change | Server address changes silently break the connection | Check your Traverse VPN account monthly for any server configuration updates and update your Windows VPN profile accordingly. |
Frequently Asked Questions About Traverse VPN on Windows 11
- Does Windows 11 have a built‑in VPN client?
Yes. Windows 11 includes a built‑in VPN client that lets you connect to third‑party VPN services like Traverse VPN without installing extra software. You still need a VPN provider account and server details to use it.
- Can I use Traverse VPN on Windows 11 without installing an app?
Yes. On Windows 11 you configure Traverse VPN manually using the built‑in VPN client by entering your server address, username, and password into the Add VPN screen. This guide describes that method step‑by‑step.
- Which VPN type is best for Traverse VPN on Windows 11?
For most users, IKEv2 is the best option because it combines strong security with good performance and fast reconnection when your network changes. If IKEv2 is blocked on a particular network, try SSTP as a fallback.
- How do I know if Traverse VPN is working on Windows 11?
Check your IP at whatismyip.com before and after connecting — the IP and location should change to the VPN server location. Then run a DNS leak test at ipleak.net to confirm that DNS requests also go through the VPN.
- Why is my VPN stuck on “Connecting” in Windows 11?
This usually indicates that a firewall, antivirus, or network filter is blocking VPN ports, or that the server details are incorrect. Make sure your server address is accurate, then temporarily disable third‑party security software to test the connection and adjust allowed apps and ports as needed.
General VPN & Privacy FAQs
-
Can I use a VPN with Spectrum?
Yes. Spectrum allows VPN usage; they can see that you are connected to a VPN server, but not your encrypted browsing activity. Most mainstream VPN services work normally on Spectrum connections.
-
Can the FBI or police track someone using a VPN?
Sometimes. Law enforcement can request VPN provider logs via court orders, use traffic correlation, or exploit DNS/WebRTC leaks and malware on a device. A strict no‑logs VPN makes tracking more difficult but not impossible.
-
**Can hackers see you when you are using a VPN? **Not directly over the network. A VPN encrypts your traffic and blocks basic Wi‑Fi snooping and interception, but it does not stop malware, phishing, or tracking cookies on your device. If your device is already compromised, attackers can still monitor your activity from inside the system.
-
**Can my ISP detect that I am using a VPN? ** Yes. Your ISP can see that you are connected to a VPN server, the server’s IP address, and connection times, but not which websites you visit or what you do on them. The content of your traffic is encrypted inside the VPN tunnel.
-
How do investigators track people behind a VPN?
They target weak points like VPN provider logs, traffic patterns, malware on devices, browser fingerprinting, and identity leaks such as logging into personal accounts while on the VPN. DNS and WebRTC leaks can also expose your real IP address.
-
Is it safe to do banking while using a VPN?
Yes, especially on public Wi‑Fi, because a VPN adds an extra layer of encryption between you and your bank. You should still use official banking apps or HTTPS websites and enable multi‑factor authentication.
-
Does a VPN make you completely anonymous online?
No. A VPN hides your IP address and encrypts your traffic, but it does not hide account logins, browser fingerprints, cookies, or device identifiers. It significantly improves privacy but does not provide complete anonymity.
Start Protecting Your Privacy on Windows 11 Today
Once your Traverse VPN profile is saved in Windows 11, connecting takes a single click from the taskbar and your browsing, downloads, and app traffic route through an encrypted tunnel.
You get the privacy benefits of a VPN without installing extra software on your PC.
For the full Traverse VPN feature set — including AI Chat, the Scam Link Scanner, and one‑tap connect — install the native app on your iOS and Android devices alongside your Windows 11 configuration.
Protect your privacy with Traverse VPN and try it risk‑free for 30 days.
For authoritative Windows 11 VPN documentation, you can also refer to Microsoft’s official guide: [Connect to a VPN in Windows — Microsoft Support].